Variations on a Theme: Hex Sign Tour


cm-hex-barn-yellow-flower-fotor

Sometimes it takes seeing something away from home to appreciate your own backyard. When I saw the barn quilt in Michigan, I realized the barns in my own state of Pennsylvania have a specialized barn quilt that have been around since at least the early 1800s. Not being from Pennsylvania originally, I had heard of Pennsylvania Dutch Hex Signs but didn’t know much more than that they existed. I saw them on barns but never paid much attention.

That is, until now.

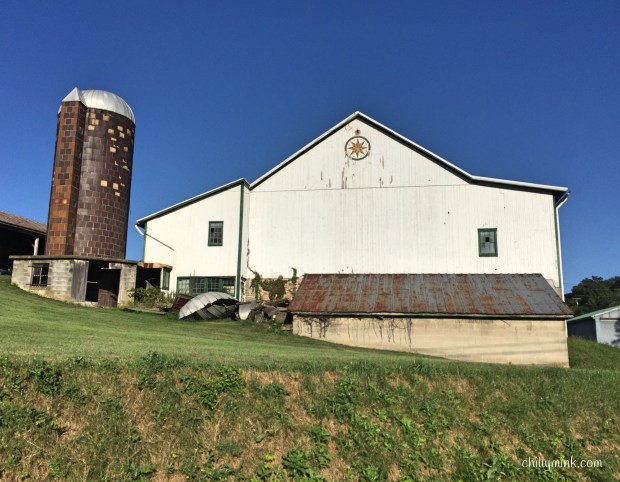
As I drove through the Berks Country Hex Trail, I could see that the Hex signs were varied and beautiful. The Hex Signs, also known as Barn Stars, take a utilitarian agricultural building and elevate it to a large scale piece of folk art.

CM Circa 1829_Fotor.jpgcm-hex-barn-silo_fotor

cm-hex-barn-hen-mailbox-fotor

What a bonus to find an amazing mailbox along the way!

cm-hex-quilt-adobe-foodfotor

cm-hex-barn-calf_fotor

Look to the left and see the friend I made!

cm-calf-closeup_fotor

My new friend up close. So sweet.

When I stopped to take a picture of one of them the owner of the property was sitting out on his porch taking in the day. After asking if he minded if I took pictures of his barn, I complimented him on how beautiful his barn was. He proudly pointed out to me that the etching on the barn requires that the signs be painted directly on the barn which is dangerous and takes dedication.

cm-hex-barn-example-closeup_fotor

cm-hex-barn-collage_fotor

Each hex sign is unique and some are quite elaborate!


Variations of a Theme: Double Take from a Friend


I received an email from a friend of mine that suggested I check out a sculpture of a giraffe she saw from the road as she was driving to her sister’s.  Her directions were intriguing and got me humming “We’re going on a bear hunt…”

I enlisted the help of my husband so that he could drive and I could take pictures and try and figure out how to get closer to it should we find it.

So, with my 35mm camera on the ready and my phone to “pin” my coordinates in Google Maps, I was scanning the right side of the road as directed when I saw the giraffe.

cm-giraffe-from-car-cloudy-fotor

Picture taken from inside the car as we were driving past it at (let’s say) 65 miles per hour.

cm-giraffe-in-vineyard-cloudy_fotor

In my excitement I “pinned” its location a little south but we were able to locate it off the highway.  I like that it is looking out over the highway. It is difficult to get a true sense of its size from this distance.

cm-giraffe-along-fence-cloudy-fotor

Getting closer.

cm-giraffe-overlooking-turnpike-foodfotor

Closer.

cm-giraffe-closeup-food-fotor


It was so fun getting a tip from my friend and being able to find it! Now that I found it it has left me with more questions than answers. Why is it there? Where is it from? Did it have a previous purpose? Maybe from a carnival? I am hoping to get more tips!

cm-giraffe-and-me-food-fotor

You just never know when you will happen upon a very large wooden giraffe!


Favorite Things: In Season

cm-winter-mailbox-cedar-crest_fotor

I drove by this mailbox a couple of weeks ago and thought how beautiful it was with the starkness of the heavily twigged tree above it. It looked like a nest to me, and the mailbox was camouflaged. I never noticed how it looked when the tree was in bloom but I will definitely keep an eye out in the future.

The change of seasons affords the opportunity to take notice of the now because it is fleeting. It got me thinking about the old adage- to everything a season. Time waits for no one. Turn, turn, turn- you get the idea!

This was re-enforced when I walked past my “Most Beautiful Mailbox” recently. It isn’t the season for it. Some things have a short window of time to be at its peak. It is special when we are there to enjoy it!

cm-beatiful-mailbox-out-of-season_fotor

The “Most Beautiful Mailbox” out of season…


CM Most beautiful mailbox

…and in season!


A Picture a Day: Day 13


cm-2-christmas-bulldog_fotor

My fascination with mailboxes began with this mailbox.  I have walked past this mailbox for years now, and today it is my picture of the day since I haven’t seen it celebrating the Christmas season before. Maybe I don’t walk as often during the holidays because it gets busy but I am so glad I saw it today before it got changed into its Russian hat!

cm-face-forward-christmas-bulldog_fotor

Technically I guess I took 2 pictures today!

Favorite Things: A Picture a Day


EPL Bench_Fotor.jpg

This is a bench! 

Many years ago I read an article about Carly Simon that I have thought about over the years but have never been able to see it through. In it she shared an activity that she incorporated into her daily routine. Every day she was sure to snap a picture using her polaroid camera. The pictures she took that were chosen for the article were candid family photos. I haven’t been able to recover my original article, but I remember her describing the daily picture taken over time became a photo essay of her life and the people in her life. What a lovely idea.

I just haven’t been able to make it a daily habit until now. So far this year… all 12 days of it!

I haven’t decided what to do with the picture a day but for now I am enjoying taking it!

img_2990

My picture taken today! 

I Have an Idea: 50 Shades of Christmas


aa_houdini_subj_e

Sometimes ideas don’t turn out as planned.

Let me explain. You may want to get yourself a cup of tea, or something stronger and settle in. This may take awhile.

Every year I struggle with what to get my husband for Christmas. I really enjoy giving an unexpected gift, but he doesn’t always make it easy.

A couple of years ago I came up with what I thought was a great idea: a destination present. After some research, I found The Harry Houdini Museum, which was within driving distance and would be a surprise!

bumper8

My next problem was thinking of a good way to wrap the gift. How do you creatively wrap an experience?

I saw the above picture of Houdini on the website and was inspired. I remembered I had saved some hardware off a purse I had thrown away thinking they may come in handy…

Then I remembered the Sock Monkey my niece gave me…

On Christmas morning, I was so excited for him to open his present. When I handed him the present I explained in a rush, “It’s more of an experience.”

This is what he saw when he opened the bag.

CM Houdini Monkey.JPG

I was confused when he looked confused and embarrassed. Our children looked embarrassed. I realized I maybe was too good at surprising! Sock Monkey did not resemble Harry Houdini- at least not enough.

To add insult to injury, the museum wasn’t open anymore.

Lesson learned: Sometimes fun isn’t as functional as one would hope.

wrapped-presentfotor

Back to the Basics for his Birthday!


Favorite Things: Brown Paper Packages Part 2

cm-christmas-tree-with-packagesfotor

I’m not sure when I started wrapping Christmas presents in Brown Paper but it became a tradition in our home. I probably ran out of Christmas paper on Christmas Eve!

cmchristmas-presents-closeup_fotor

The white ribboned present is for our dog, Katie!


It makes identifying presents easy since our daughter’s presents are tied with red ribbon and our son’s are green, a “Family” present is ribboned with green, red, and white and presents that are shared have the colors of the ribbons of the joint recipients. I never had to worry about running out of Christmas paper again!

Favorite Things: Bread addendum

PRINT MALFUNCTION FIXED!!!!

I was ready to try to make the Buttermilk Oat Bread independently. I went to Chillymink.com to print out the recipe and discovered it didn’t work!

The problem is fixed now – the recipe printed out and bread is in the oven. I hope this hasn’t inconvenienced anyone. Please give it a go!

Buttermilk Oat Bread

  • Servings: 1 loaf
  • Difficulty: moderate
  • Print

A hearty bread that's great for toasting.


This recipe requires several hours of rising, so make sure you plan accordingly.

Ingredients

  • 1 tablespoon active dry yeast
  • 2 teaspoons sugar
  • ½ cup warm (~100°) water
  • 1 tablespoon kosher salt
  • 1 cup old-fashioned rolled oats
  • ½ cup butter
  • 1 cup buttermilk
  • 1/3 cup honey
  • 1 ½ cup whole wheat flour
  • 2 ½cup all-purpose flour

Directions

  1. In a small bowl, mix together yeast, sugar and water. Let sit as you continue. The yeast should foam up.
  2. In a large bowl, mix together oats and salt. Set aside.
  3. In a small saucepan, melt butter. Add buttermilk and honey and heat until warm, but not so hot that the buttermilk separates. Pour the mixture over the oats, stir, and let sit for 10 minutes.
  4. After 10 minutes, the oats should be softened. Add the flour and yeast mixture. Mix until a dough is formed. You may need to add more buttermilk or flour to develop a good consistency. The dough should be a little sticky but well formed.
  5. Roll the dough out onto a lightly floured surface. Knead the dough for several minutes until it is firm but still elastic. Put the dough back in the bowl, cover with a towel, and let rise for 1 hour.
  6. Punch the dough down a bit and take it out of the bowl. Form it into a loaf and place it in a loaf pan. I use a stone cooker with a cover, but if you don’t have a cover, simply use a towel. Let rise for another hour.
  7. Uncover the loaf and sprinkle the top with a light coating of kosher salt. Set the oven for 400°.
  8. If using stoneware, put the bread in with the cover on for 25 minutes, then remove the top and bake for another 10-15 minutes until the top is nicely browned. If you don’t have the covered stoneware, bake for 20 minutes, then cover with a sheet of aluminum foil to keep the top of the bread from burning and bake for another 10 minutes.
  9. Take bread out of oven and let cool completely before cutting.
  10. Enjoy!

cm-bread-in-oven


Favorite Things: Color Part 2


cm-turkey-cake-finished

Large cakes and color are becoming a new theme! Last month I found the Wilton Performance Color System for baking and made a pumpkin cake for Halloween that was fun to make!

cm-pumpkin-cake-fotor

Now Thanksgiving has provided an opportunity to use the color chart again! Once again I went back to my old recipes and found a Turkey Cake recipe that I had made years ago. This cake, like the Pumpkin Cake, was the actual size of a roasted turkey.

I remembered that the last time I made it, I was disappointed with the final color of the turkey. It looked raw. Now that I had my color chart, I was hoping it would look more realistic this time. The recipe is from a back issue of Family Fun, which was my favorite magazine when my children were young.

You bake 2 vanilla cakes in round bowls. They take longer than when they are baked in 9 inch round pans.

Then bake 1 spice cake in a 9-by-5-inch loaf pan. Similarly it takes longer in the loaf pan than a round pan. I kept checking for doneness but I think they took about 40 minutes. The round bowls were closer to an hour. I just kept checking with a cake tester.

cm-turkey-cakes-no-frostingfotor

Once the cakes were finished I let them cool on a rack for 10 minutes and then popped them out to finish cooling.

This cake takes a lot of frosting. I used close to 4 cans of store bought buttercream frosting.

Before assembling the pieces I put the cake in the freezer for 15 minutes.

cm-turkey-cake-body-frosting_fotor

Basically you make a very large Whoopee Pie!

cm-turkey-cake-frosting-glue

This is an important step- secure the “Whoopee Pie” with a dollop of frosting on the platter.

turkey-cake-spice-cake-cut-fotor

Trimming the legs out of the spice cake is tricky. Just keep trimming until it looks like a leg! Frosting hides a lot.

cm-turkey-cake-assembled-s-frosting_fotor

I used coffee stirrers (wooden ones) to attach the legs to the body (it is no longer a very large Whoopee Pie!)

cm-turkey-cake-s-frosting-front-view_fotor

It’s starting to look like a turkey. I also think it looks like a Harry Potter Snitch or Captain America’s mask.

cm-sand-food-coloring

Now to the color- I used “Sand” for the base layer of frosting.

cm-turkey-cake-food-color-w-bottle_fotor

cm-turkey-cake-first-color-mix

Mixing 4 cans of frosting required my large mixer.

cm-turkey-cake-color-highlight_fotor

Once I frosted the cake with the base “Sand” color I added more brown and black to the remaining frosting until it turns a few shades darker. I added the darker color to the parts of the “turkey” that would darken as it cooks.

cm-turkey-cake-finished

Adding the oranges and paper caps added a touch of authenticity!

cm-turkey-cake-closeup-cut

It was fun to carve it like a turkey!

cm-turkey-cake-3-pieces-cut-_fotor

Happy Thanksgiving!

cm-turkey-cake-set-table